
# FAQ For Google Marketplace
Here are answers to commonly asked questions about our service.
# Pre-requisites
# How to set up a google cloud service account
Go to service accounts (opens new window), and create a service account.
Fill in the name and id.
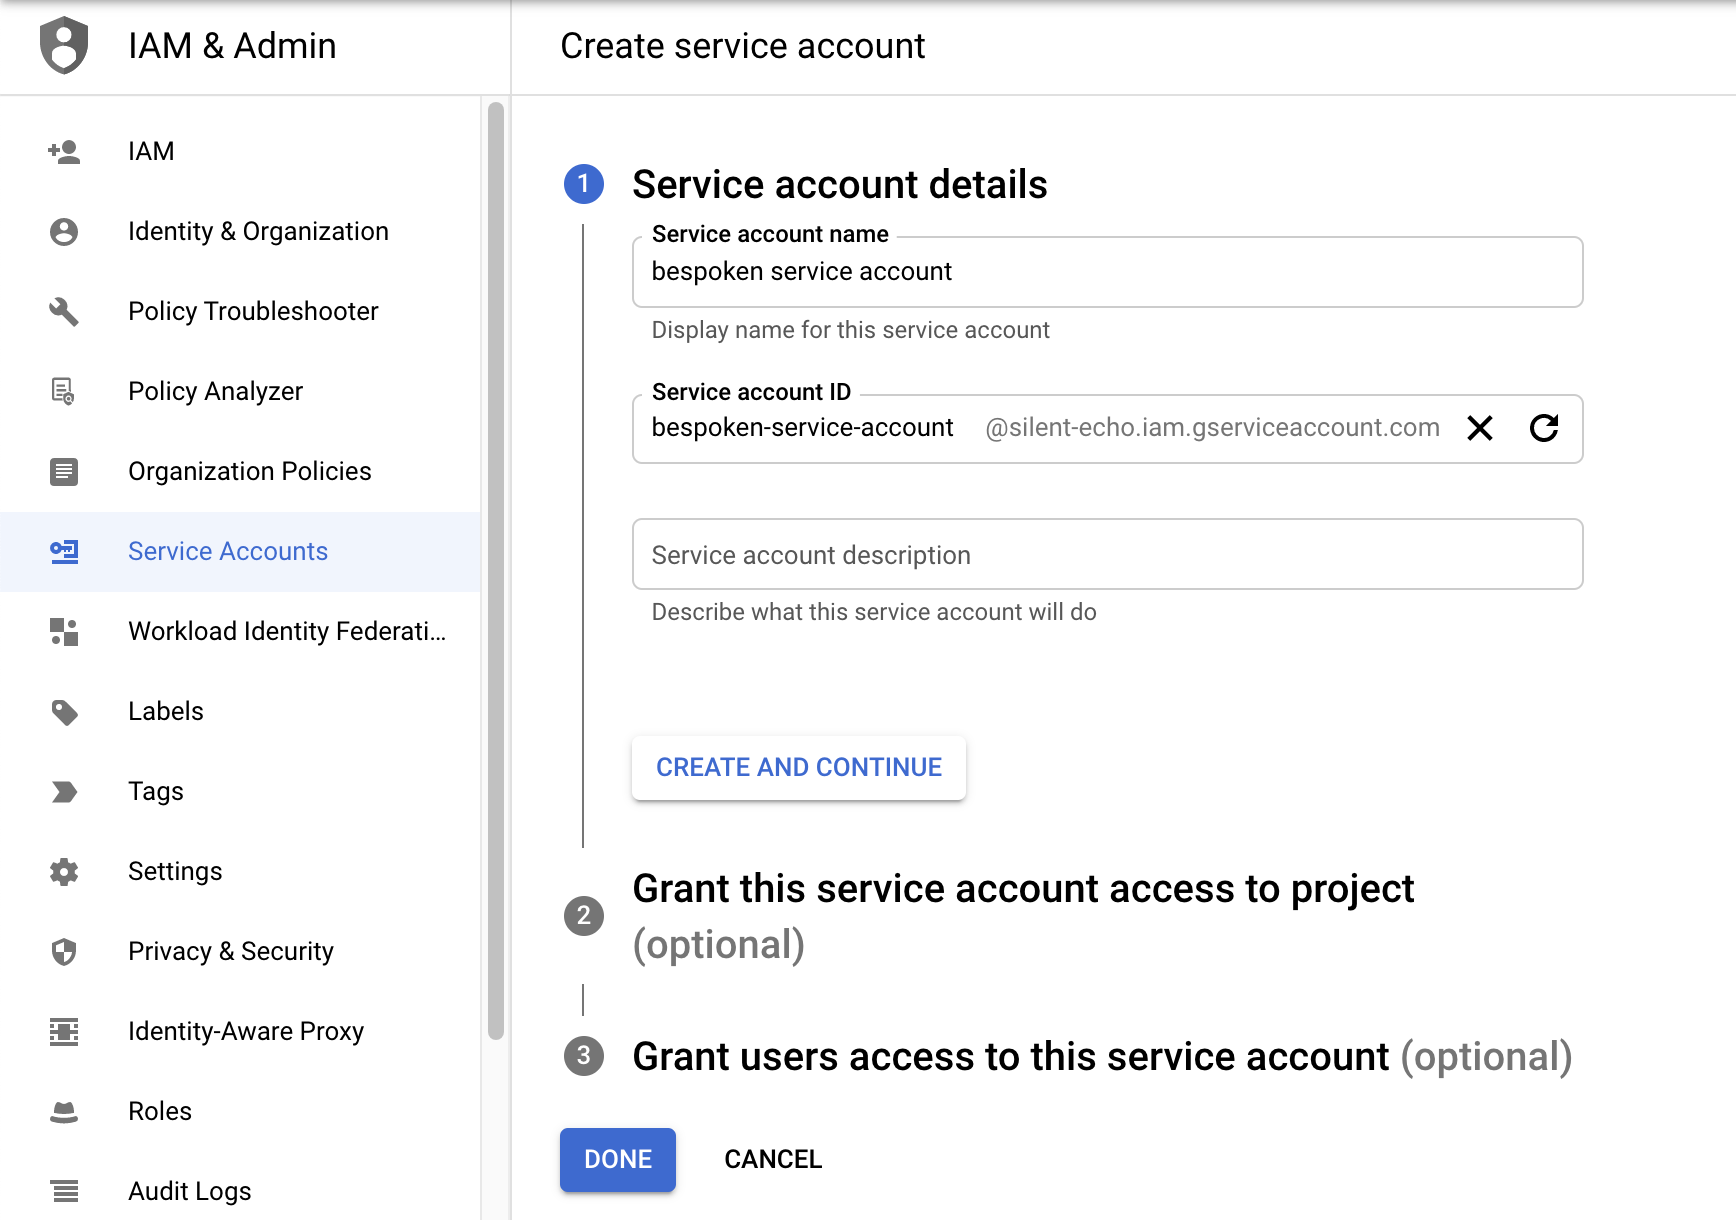
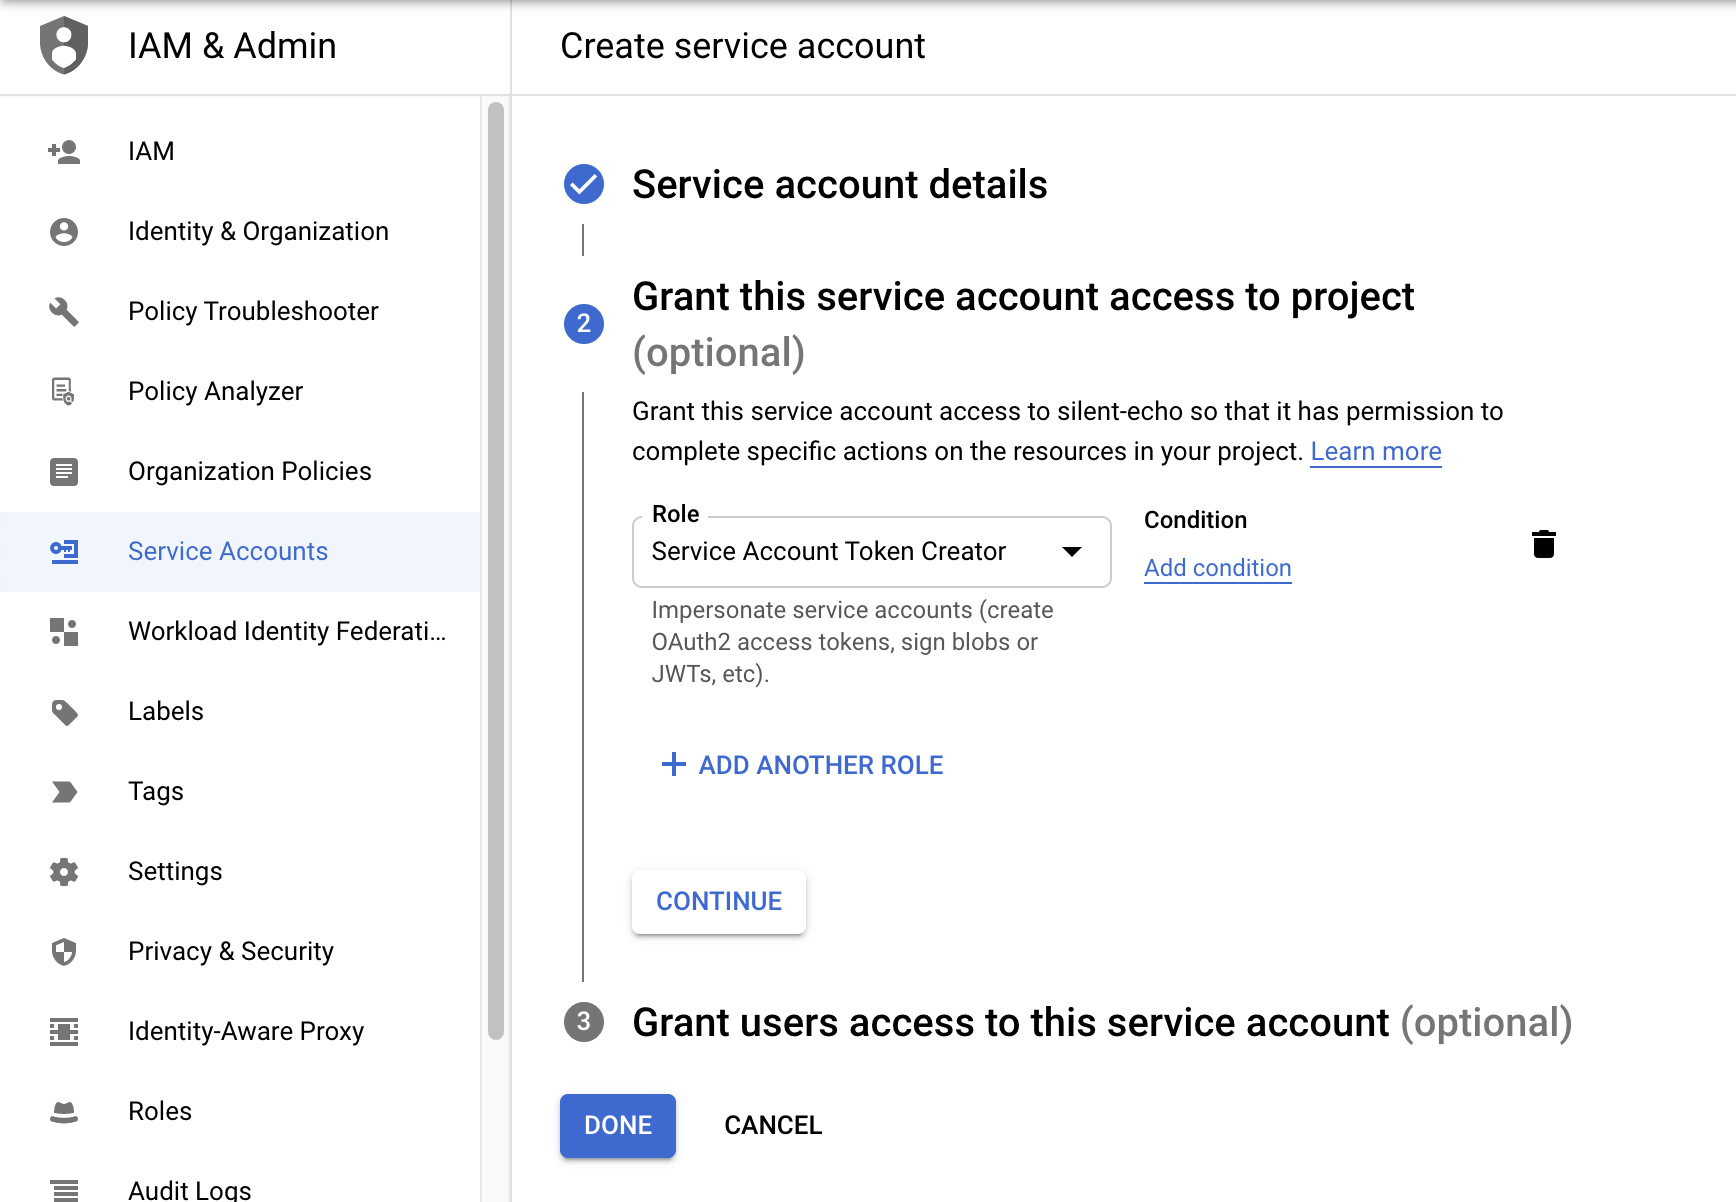
Grant the role "Service Account Token Creator", and complete the process with the default values.
Search for the newly created account service, see the details, and copy the "Unique ID".
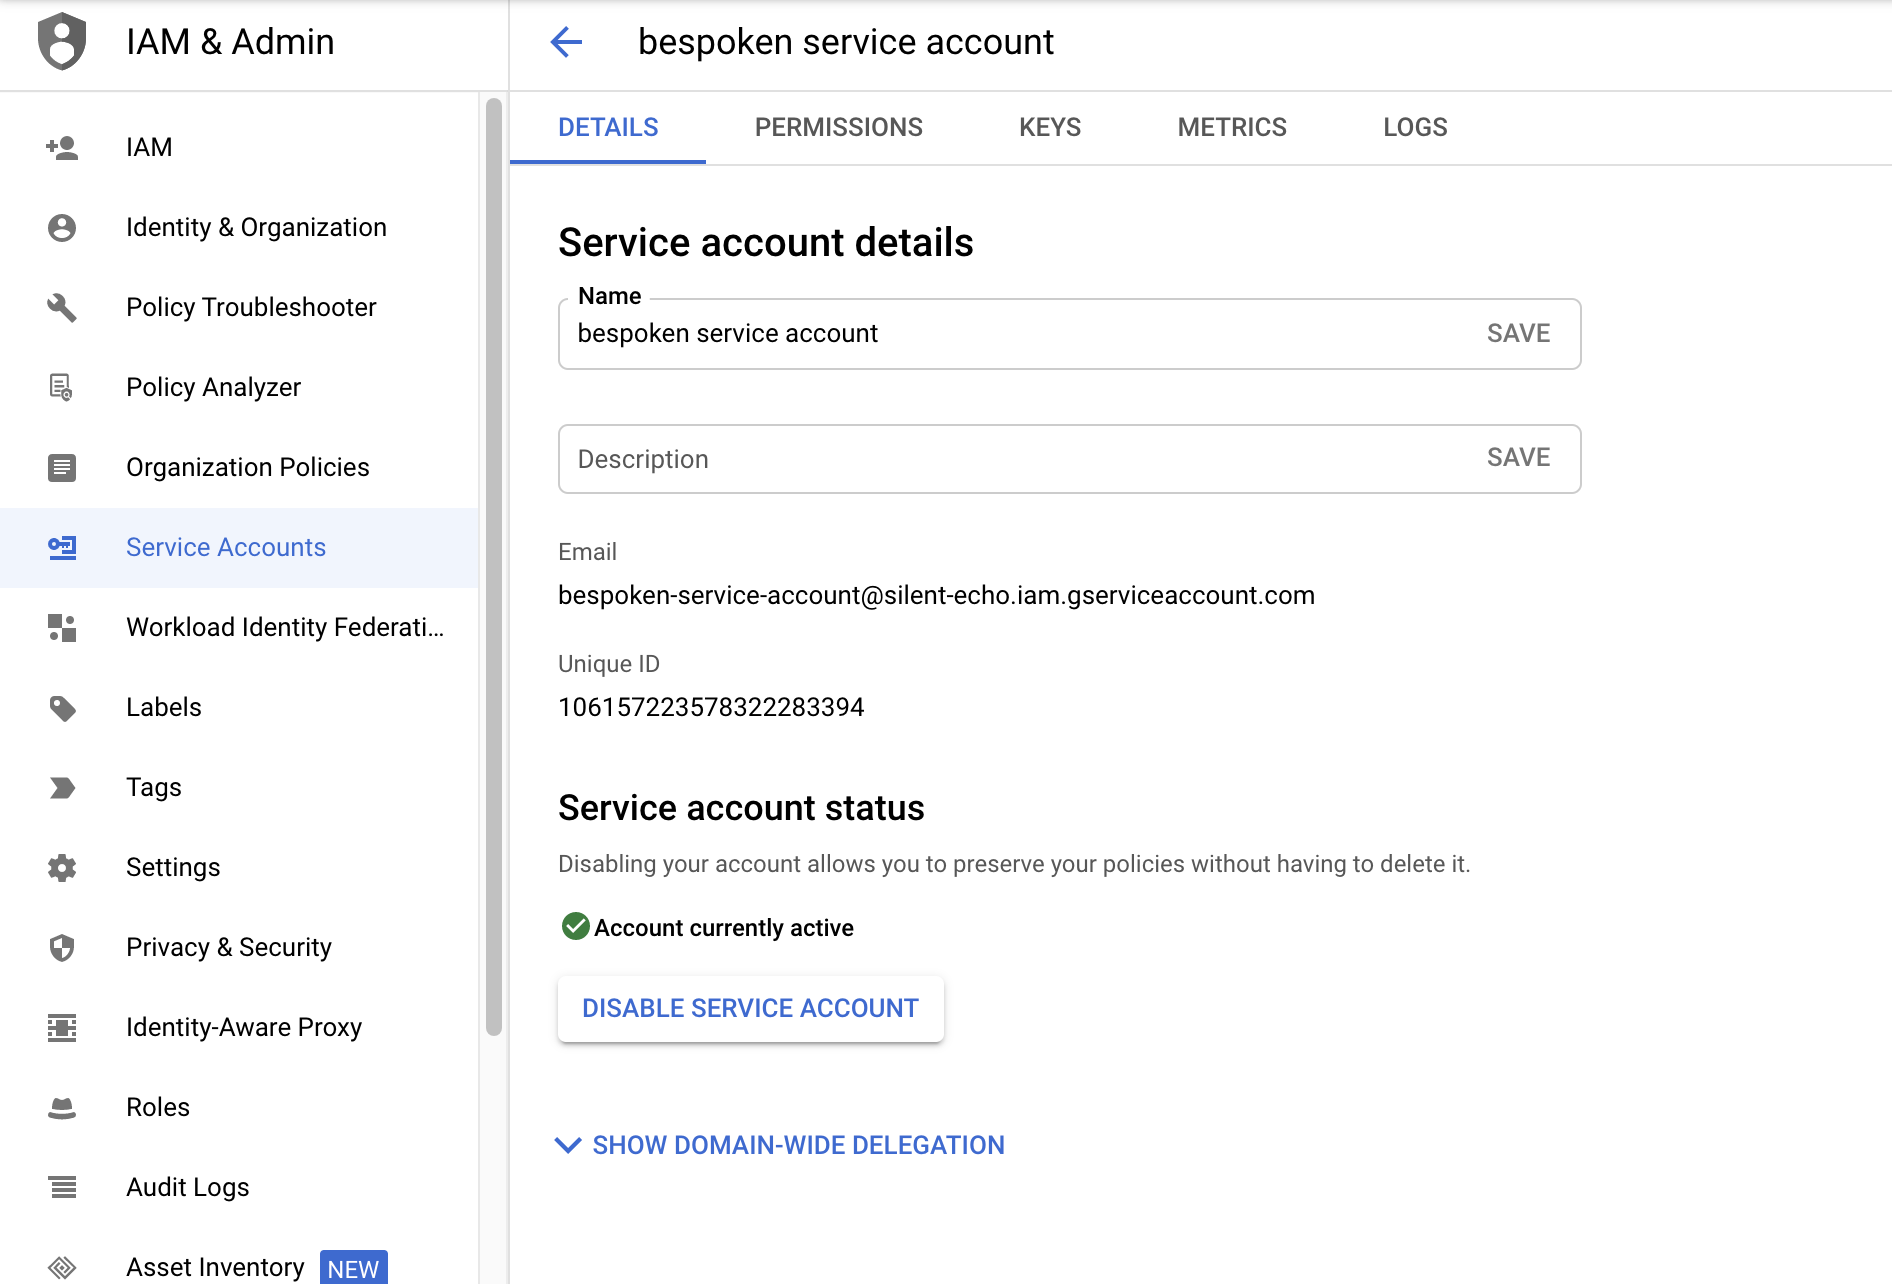
Reach the bespoken team at contact@bespoken.io, requesting the access credentials, you will have to provide the "Unique ID", they will reply with some settings to set up your Google VM.
# How to set up an https URL that works with the Bespoken VM
- Redirect traffic from your load balancer to the VM.
- Set up your https certificate within the VM.
# Redirect traffic from your load balancer to the VM
If you already have in place an external HTTP(S) load balancer in your environment we can use it to redirect the request to our VM.
First, we need an unmanaged instance group, you can follow these steps (opens new window), you just need to add the VM into the group and add a port name "port-3000" and port 3000 during the creation of the instance group.
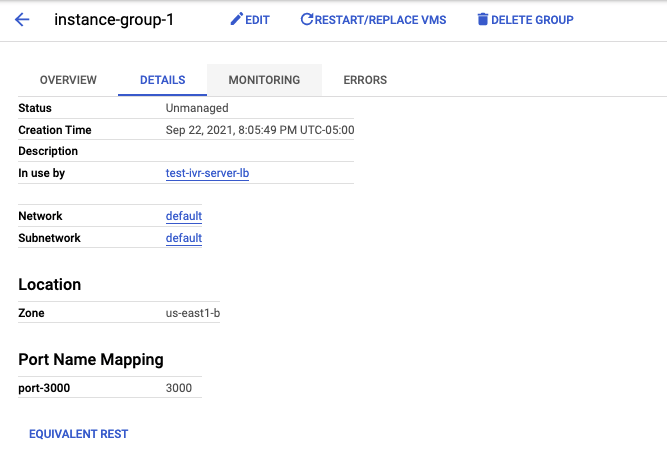
Go to the list of load balancers (opens new window) and select the one you will use.
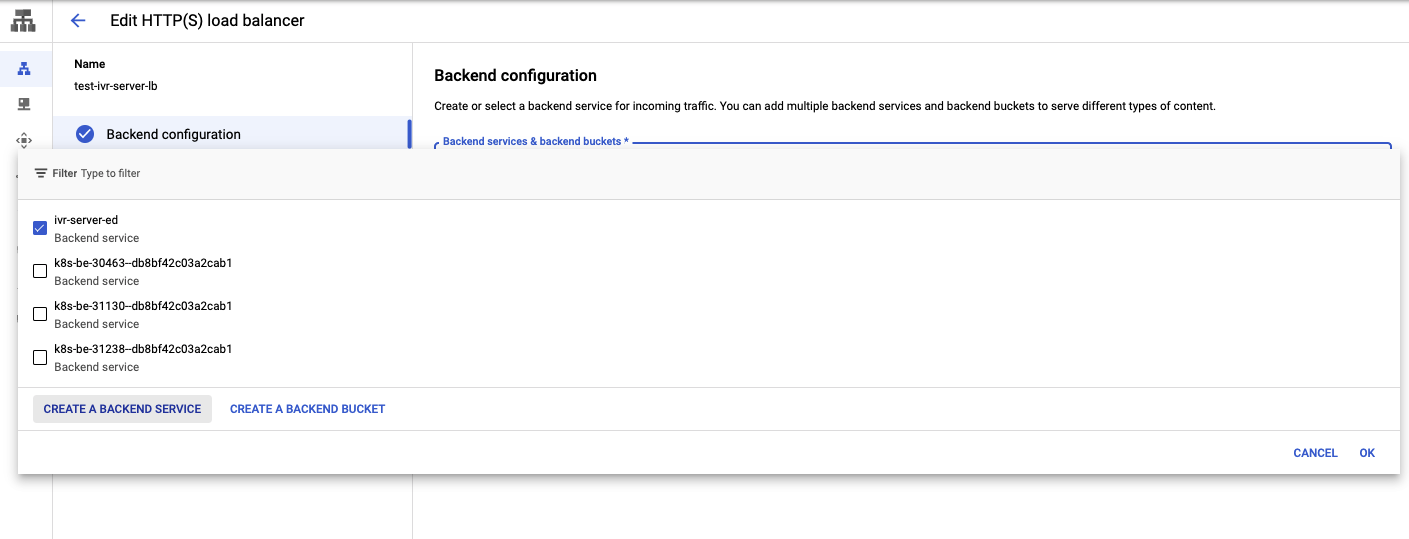
Edit the load balancer, then in the backend configuration create a new Backend Service
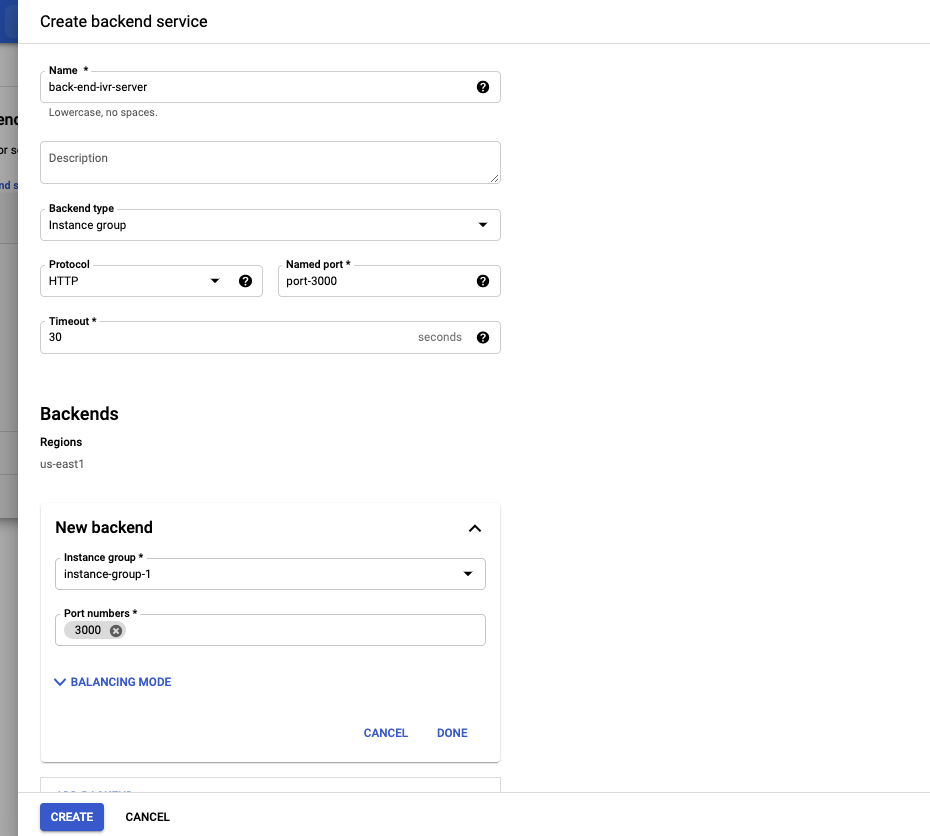
Fill up the fields "Backend type": "Instance group", "Protocol": "http", "Named port": "port-3000". In the "Backends" section, select the instance group created in the previous step, in "Port numbers" put "3000"
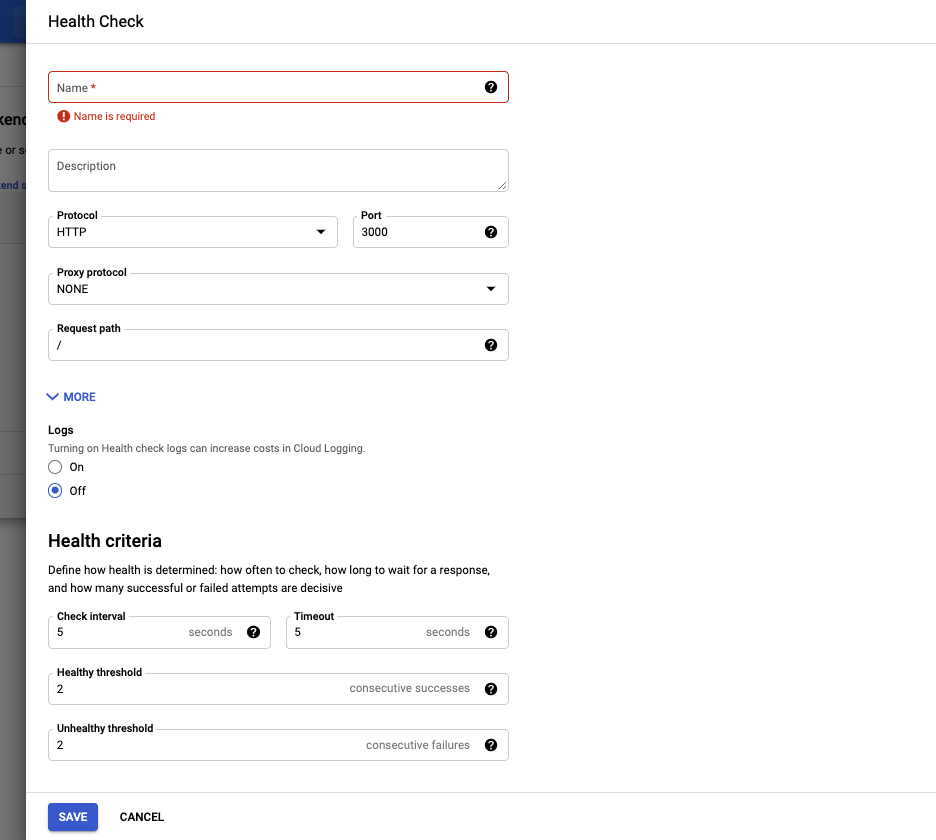
Scroll down until field "Health check", you have to create a new one. Using "Protocol": "http", and "Port": "3000".
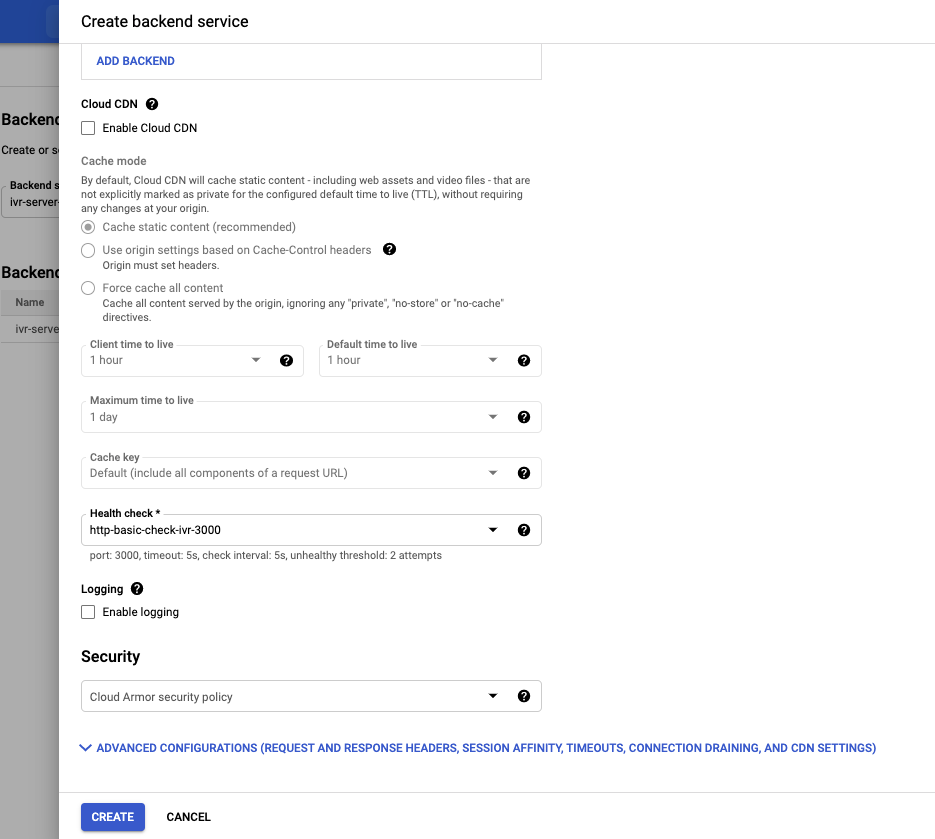
Select the newly created "Health check", and finally click on "Create".
In the "Host and path rules" click on "ADD HOST AND PATH RULE". For field "Hosts" fill up with the URL defined in pre-requisites, for "Backends" select the backend service created previously.
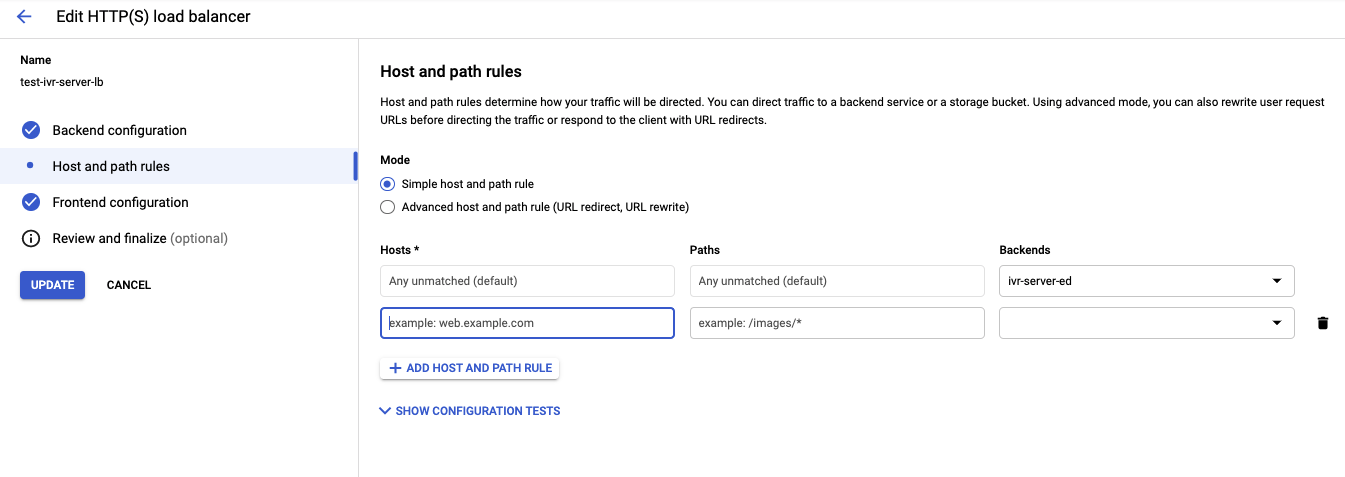
Finally, click on "Update".
You should now be able to access your domain using an https:// connection.
# How to set up your own https certificate within the VM
NOTE: Before using this approach, ensure that you have access to the domain’s DNS configuration through your DNS provider.
For all the following commands, change your_domain with the domain you will use. Example: ivr-server.bespoken.tools
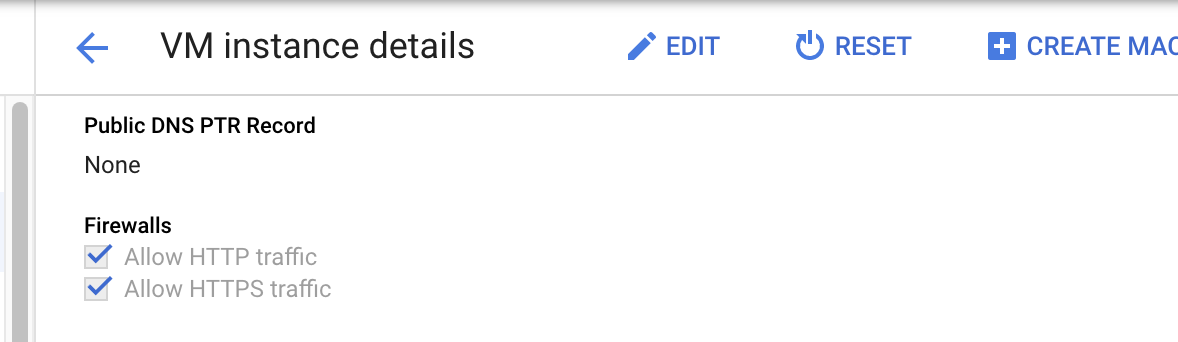
# Allow http and https traffic
Make sure the firewall allows traffic to HTTP and HTTPS, update otherwise.
# Configuring a static IP Address
Google Cloud Platform instances are launched with a dynamic IP address by default, which means that the IP address changes every time the server is stopped and restarted. This behavior is not desired, we have to reserve a static IP address and assign it to the VM. Follow the instruccions (opens new window).
# Update DNS record
Create an A record in your DNS provider, to point to the IP address set in the previous step. You should get a response when accessing the domain:
http://your_domain
# Enable SSL access over HTTPS with letsencrypt
Connect to VM before executing any command.
Create the directory for your_domain as follows, using the -p flag to create any necessary parent directories:
sudo mkdir -p /var/www/your_domain/html
Next, create a sample index.html page using nano or your favorite editor:
sudo nano /var/www/your_domain/html/index.html
Inside, add the following sample HTML:
<html>
    <head>
        <title>Welcome to your_domain!</title>
    </head>
    <body>
        <h1>Success! The your_domain server block is working!</h1>
    </body>
</html>
Save and close the file by typing CTRL and X then Y and ENTER when you are finished.
Execute the command:
sudo nano /etc/nginx/sites-available/your_domain
Paste in the following configuration block, replacing the domain name. If you have changed the default port, update accordingly:
server {
  listen 80;
  listen [::]:80;

  root /var/www/your_domain/html;
  index index.html index.htm index.nginx-debian.html;

  server_name your_domain;

  location / {
    proxy_pass http://localhost:3000;
    proxy_http_version 1.1;
    proxy_set_header Upgrade $http_upgrade;
    proxy_set_header Connection 'upgrade';
    proxy_set_header Host $host;
    proxy_cache_bypass $http_upgrade;
  }
}
Execute the command:
sudo ln -s /etc/nginx/sites-available/your_domain /etc/nginx/sites-enabled/
To check for errors:
sudo nginx -t
Restart the nginx server:
sudo systemctl restart nginx
If you access your domain you should get a message like this:
{"message":"Health check: Looks good!","timestamp":"2021-06-18T21:04:04.683Z"}
Now, we will generate a SSL certificate:
sudo certbot --nginx -d your_domain
If this is your first time running certbot, you will be prompted to enter an email address and agree to the terms of service. After doing so, certbot will communicate with the Let’s Encrypt server, then run a challenge to verify that you control the domain you’re requesting a certificate for.
If that’s successful, certbot will ask how you’d like to configure your HTTPS settings.
Output Please choose whether or not to redirect HTTP traffic to HTTPS, removing HTTP access.
1: No redirect - Make no further changes to the webserver configuration. 2: Redirect - Make all requests redirect to secure HTTPS access. Choose this for new sites, or if you're confident your site works on HTTPS. You can undo this change by editing your web server's configuration.
Select number 1.
Your certificates are downloaded, installed, and loaded. Try reloading your website using https:// and notice your browser’s security indicator. It should indicate that the site is properly secured, usually with a lock icon.
# Server configuration
# How to connect to the VM
You can connect to the VM through the Google Cloud Console (opens new window).
# How to start and stop the server
Connect to VM before executing any command.
Obtain the status of a service:
sudo -u bespoken /home/bespoken/scripts/status.sh
To start the service:
sudo -u bespoken /home/bespoken/scripts/start.sh
To stop the service:
sudo -u bespoken /home/bespoken/scripts/stop.sh
# How to update server settings
You can update the server settings updating the instance metadata (opens new window).
| Name | Description | Default |
|---|---|---|
| role-arn | Value provided by bespoken to access their services | |
| secret-name | Value provided by bespoken to access their services | |
| url | Base url to access the service |
You must restart the VM after any change.
# Troubleshooting
# How to access server logs
The logs contain information that can be useful for troubleshooting possible issues. They can be found connecting to VM and executing the following command:
sudo -u bespoken /home/bespoken/scripts/logs.sh